Image Map

August 24, 2015

Fluffy Fuzzies Once Again!


I use Pom-poms (or fuzzies as we call them) for my classroom management. Students who earn 20 fuzzies can turn them in for a coupon. You can get freebie coupons like this one from Stories by Storie. Or make your own coupons. I do take away a fuzzy if students are not following our classroom rules. But...what I wanted to share happened upon me by accident. After a couple of years, my fuzzies were beginning to look icky. I would spray them with Lysol to kill the germs, but it just made them look so sad! 

The other night, I washed my apron and forgot that I had fuzzies in my pockets. I never saw them when I transferred them to the dryer.  After a good wash and drying time, they came out fluffy! They almost looked new. I decided to take the rest home and I washed and dried them in a lingerie bag. I have fluffy fuzzies once again! 

Enjoy! 


August 19, 2015

First Day of School Teacher Gift


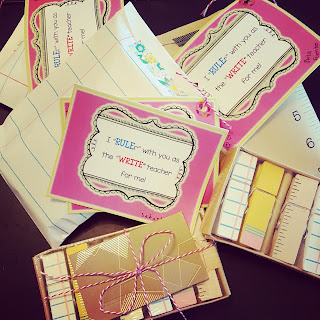
I love giving a little something for my children's teachers on the first day of school. I nabbed these adorable school theme clips from Target One Spot. I also purchased the school theme gift bags. My favorite one is the wide ruled paper!  I simply added a yummy Starbucks gift card and created a tag to go along with the ruler, paper, and pencil theme. Easy Peasy! 


Click HERE for a free download


Border Credit
Font Credit


August 17, 2015

Back to School!


It's that time of year...BACK TO SCHOOL!  
I found these cute Parent-Wish Jar on TPT created by Kimberly Gillow.  This is so sweet to ask parents to write down their wish for their children at a Back to School Night or Open House Event. I asked parents to write their address and students' names on an envelope I provided for them.  I read them afterwards, and I put them away for the school year. Ms. Gillow keeps them in a jar to reread them throughout the year. But I thought it would be neat to send their parents' wishes to the students during the summer. I decided for this school year to make my own to match my classroom theme. Enjoy! 
Here's a sample of a parent's wish to her daughter. I just simply folded it up and sent it with a card and the envelope my parent filled out at BACK TO SCHOOL NIGHT.
Click here for the Zebra Print.


Click here to download these


Border Credit
Font Credit


July 14, 2015

HEY, LET ME ADD THAT TO MY PLANNER!

I started participating in this crazy but fun and crafty world of planning your days with planner books. I did a lot of research on different planners and decided on Websters Pages Color Crush Planners. It had to be small enough to fit my teacher bag. You can purchase cute inserts for it via Etsy, but I love the ones that came with the planner itself. 
Since I am not as creative as I liked to be, I watched how others (instagram) decorated their monthly, weekly, and day by day planners. I will admit that I knew I would not have the time to do it all! Some planner people have more than one or two planner books! For me, I needed ONE centralized organization for all upcoming events in my teacher, mother, wife, friend, and so on world!
I did sorta (maybe a lot) went overboard in preparing myself for this planner crazed world. However, I was frugal! I purchased all of my stuff either on sale, on clearance, and always with a coupon! I did purchase some of my planner stickers through Etsy. 
I decided not to decorate my monthly calendar pages. I use it to jot down the important events. I set a time on Sundays to decorate the upcoming weekly pages. I check on my monthly pages to see what is coming that week. Decide on either a theme or color scheme I will use to decorate my weekly. I find it relaxing and fun to craft my weekly pages. My very first week I themed it to my favorite, Hello! It doesn't take long to figure out which washi tape, stickers, or dashboards to use. So far with my new planner book, I feel like the most organized and decorated person on earth! You wanna what? Hold on...let me check my planner to see if I am available.

                         My Michaels Haul

Wrap Washi Tape around used gift cards. 
Easy to travel with.

Travel Pocket

Week One

Week Two

                                    Week Three

Dashboard

And to hold it all together, a pink Craftsman Tote!

July 4, 2015

Love It!

I am thrilled with my new blog design by Gabby. I told her my classroom theme, the colors I liked, and answered a few more questions on her design form. I didn't know what to expect, but I knew it was going to turn out great after reviewing the other blogs she designed.
I will admit that I shed a few tears when I saw the final product! She is AMAZING! I am not tech savy, but if I were, I would still spend every penny to have Gabby design my blog! She is quick and made the process very easy. I had the biggest smile when I saw my header on her site. Love it!
Check her blog at  www.gabbysclassrooms.com

February 21, 2015

I Survived

Every year my family and I visit New York City during our Thanksgiving Break. I love the splendor and beauty of the New York City lights during the holidays! Beyond the carriage rides at Central Park, stopping at FAO Schwarz, and eating NYC pizza, we make it a habit to visit Ground Zero, 9/11 Memorial.
I find it hard to explain to my children about what happened on 9/11. Bringing them to the memorial makes it real to them. They learn the truth by the names engraved around the twin memorial pools.
Every time I go I take a picture of a particular tree. This year, I noticed it was the only tree that looked different from the others. Rightfully so. It is a tree that survived 9/11.
I myself cannot fathom the pain of those who have lost their loved ones during this horrific day. My heart goes out to all of them. So, when I look at this tree I see strength. Strength in the people who overcame.
I see hope as well in this tree. A tree that may represent Jesus himself. When He went home, the angels rejoiced with Him because He survived. He is alive! There is hope for me when Jesus returns. I want to stand next to Him and say, “I survived!”
20141128_134449
Visit the site, and learn more about The Survivor Tree.

I am Baker

I am not a baker. Baking for me was grabbing a package of pre-made dough and plopping it on some metal sheet and pray that I didn't scorch them (it happened a couple of times).
I picked up my baking skills from my sweet friends. They taught me that there is a difference between butter and margarine. With margarine your "made from scratch" cookies will come out as flat as a sheet of paper. Today, my fridge carries only unsalted sweet cream butter. I'm pretty proud of myself.
I enjoy baking even though I am new to it. What I enjoy the most are the smiles that come from my children. I love to hear, "Mmmm, this is delicious" each time they took their first bite of a freshly baked chocolate chip cookie or cupcake. Still, I felt very new to baking.  I cannot simply follow a recipe for that perfect batch. I learned techniques to make sure cupcakes were moist and cookies were chewy but not too leathery. I was a novice baker, and I hadn't baked a cake yet.
So, imagine my surprise when one of my coworkers, my friend, asked me to bake her a wedding cake (now, imagine the sound of a music record screeching to a halt). She wanted me to do what?!
I didn't give her an answer although I wanted to tell her no. I almost admired her faith in me that she thought I could pull this off.

My baking friends told me I can bake a cake. I can? And so I started to ask the Bride-to-be questions. What kind of cake? No frosting? Naked what? And with that I was on Pinterest searching naked cakes; cakes with no frosting. The Bride-to-be wanted a chocolate layer and coconut layer for her wedding cake. I experimented baking cakes for special occasions and birthdays like the one I did for my son. 
I didn't like the two tone colors for a naked wedding cake and neither did the Bride-to-be. I decided to bake two wedding cakes, one coconut and the other chocolate.  Talk about added pressure! I took a moment to remind myself to bake with love like I do for my own children. And so I did! I couldn't believe I did it! I based the cakes from Pinterest that linked me to Style Me Pretty The following pictures of my cakes were taken by Milli Mike Photography

She had a book theme wedding in a beautiful barn on Flora Corner Farm. I was treated as a vendor. I was able to capture pictures before the wedding with my cell phone. I loved every detail of her wedding decorations. I loved the simplicity of using wooden letters as wedding toppers.
Books were wedding favors for her guests.

Check out her dessert table! 

I loved her wedding bouquet!

These two pictures by Milli Mike Photography shows more of the beautiful details.

I love the pages of a book bouquet for her bridesmaids. 

All that hard work (and pressure) for love! 

I created my cakes based on Pioneer Woman Cooks by Ree Drummond and on a Pinterest picture from Style Me Pretty.

It was a gorgeous wedding filled with love and joy! Now the Bride thanked me and with her smile I knew she loved her cakes! She made me a gift box full of the little things I like. Along with my very own wooden letter! Check out the title of the book she gave me. A good book always goes well with a yummy slice of cake. You know what? I am baker!